I say Mango you say Mongo (for images)

(Photo by Avinash Kumar on Unsplash)
I recently looked into how MongoDB can facilitate storing and retrieving images, and had some difficulty implementing the examples I found online. Here is the solution I came up with to serve as hopeful help in the future for me or anyone else.
Background
MongoDB is primarily a document database, not designed for larger files, so CRUD operations for files over 16MB is not supported. Mongo’s solution is GridFS, a dedicated mongo database structure for larger files. This is more of a bucket to dump large files, which is split between two collections, one which stores the file’s metadata, while the other, the binary data source.
It took a bit of poking around but I was able to get an image database working with MongoDB using GridFS. Because the setup was a bit confusing, and I was unable to find a working example with the latest version of Mongo, I am going to detail the solution I used, in an effort to help someone else, but primarily as a historical document that I can refer back to if I ever need to do it again!
The Solution
The version of mongo may change how this is implemented. But this solution currently working for version 4.
Mongo will use a separate database for images that will use their GridFS layout. The GridFS database has two collections, chunks and files, where chunks stores the files’ binary chunks and files stores the files’ metadata, e.g. the files’ name (more info here).
To begin, a new database needs to be created with user permissions for that GridFS database. Setting up a new database called bucket with a user called bucketUser that has readWrite permissions, will allow images to be stored and retrieved from bucket.
On the server side files can be stored into bucket with a command line interface called mongofiles. The downside of using mongofiles is that the password seems to be passed in the clear on the command line.
Authenticating writes to this bucket db may be better suited for MongoDB Compass, or your own custom admin panel, else be sure to clear the bash history from the terminal before logging out of an ssh session.
cat /dev/null > ~/.bash_history
from askubuntu
Next I added a couple test images to the bucket with the following command:
assuming user is bucketUser and the db is bucket
mongofiles -u bucketUser -p 123456 --db bucket put image.jpg
Using the command put will save the file image.jpg to the bucket
database.
Once the bucket is set up, and there are a few files to test in it, we can move on to the challenge of retrieving them.
Getting access via an api for the image database was a bit of a challenge, that I hope to avoid in the future. The first trick is that the express mongoose driver doesn’t support GridFS, (or at least it doesn’t appear to, but if so use that because that would be easier).
To access the GridFS database from an express application the official mongodb driver for Node.js is needed.
Install the mongodb driver for the Node application.
Then we will need to construct a MongoClient with:
const mongodb = require('mongodb');
const MongoClient = require('mongodb').MongoClient;
we also want to declare our database information:
const imageDB = config.get('imageDB');
const imageBucket = config.get('imageBucket');
as well as some options for the db connection:
const options = {
  useNewUrlParser: true,
  useUnifiedTopology: true,
}

let db;
Then, within the route declaration we will use MongoClient to connect to the database:
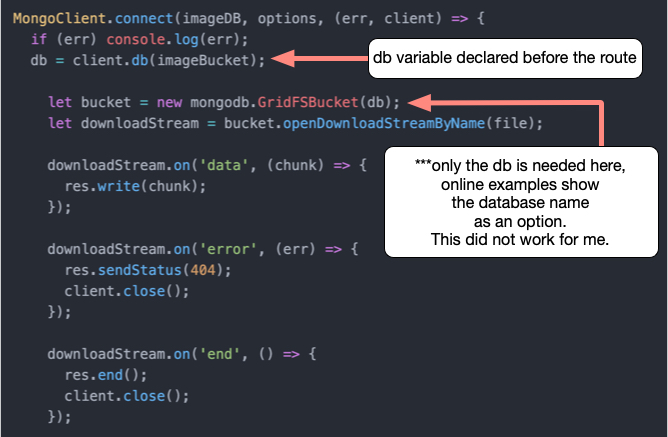
Note that online examples declare the variable bucket as follows:
  let bucket = new mongodb.GridFSBucket(db, {
    bucketName: 'photos'
  });
This did not work for me. The above code example, however, does work.
Most of the download stream references are boilerplate which comes from other examples, and the driver documentation.
This is the declaration for an express get route for retrieval. There are other examples available to implement a put route, but I only needed a get route, so this example demonstrates only that.
The full code example is as follows:
const mongodb = require('mongodb');
const MongoClient = require('mongodb').MongoClient;
const config = require('config');
const express = require('express');
const router = express.Router();

const imageDB = config.get('imageDB');
const imageBucket = config.get('imageBucket');

const options = {
  useNewUrlParser: true,
  useUnifiedTopology: true,
}

let db;

// get an image file by name
router.get('/name/:filename', async (req, res) => {
  let file = req.params.filename;

  MongoClient.connect(imageDB, options, (err, client) => {
    if (err) console.log(err);
    db = client.db(imageBucket);

      let bucket = new mongodb.GridFSBucket(db);
      let downloadStream = bucket.openDownloadStreamByName(file);

      downloadStream.on('data', (chunk) => {
        res.write(chunk);
      });

      downloadStream.on('error', (err) => {
        res.sendStatus(404);
        client.close();
      });

      downloadStream.on('end', () => {
        res.end();
        client.close();
      });

  });

}));

module.exports = router;
And that is it. A bit tricky to get the db instantiated, but once that is solved, the rest works as the api documentation states.
The next challenge is building an admin dashboard for CRUD operations. But I will leave that for the future.
disclaimer: these musings are offered, at best, as educational, and at worst for entertainment purposes. Do not take action on the descriptions above, as they contain risks, and are not intended as financial advice. Do not do anything above.